Imagine Worlds / Creative & Technical Modelling – Start

For Matt the class has been assigned to create a model that follows the production line that a model would follow in the industry. I decided to link this project in with my Imagine Worlds project. This meant that I had a choice from the asset list on Trello for what I could model. I chose to create a hatchet. I had modelled a fire axe in the past so I used this and other images for reference on how I could make it.

axe.PNG

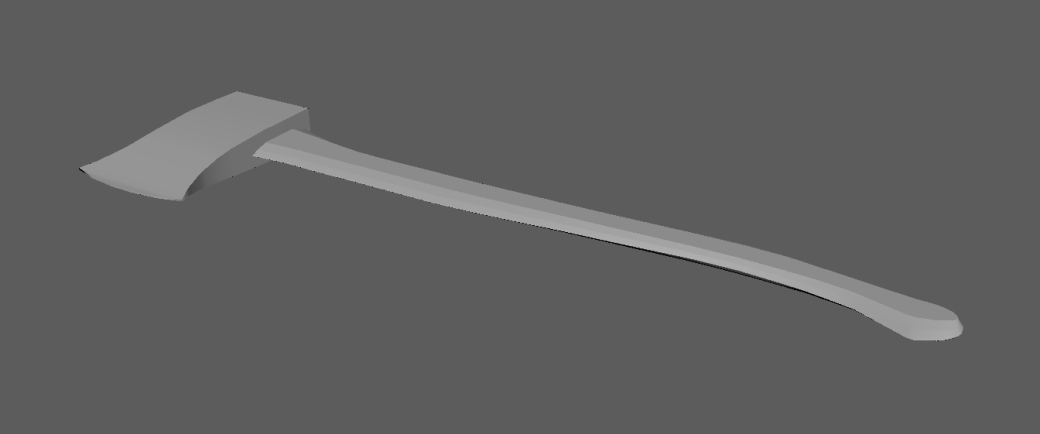
For my fire axe all I had was the low poly version. I used the handle from this and created a new head. I had also reshaped the handle slightly to fit the design a bit more. This is how my Low Poly model of the axe turned out.

Low Poly

Low Poly Mesh

Following this I began to UV unwrap the model, this stage was not very difficult and I did not encounter any problems. The model consisted of two meshes, the head and the handle; however I chose to combine these together. I then added a checkered texture to the model and resized the UVs so that all of the checkers were roughly the same size throughout. I then used the layout function so that they fit nicely onto the map.

UVs.PNG

UV Model Checkers

Now that the low poly was complete it allowed me to begin work on the high poly mesh. I started this by duplicated and renaming the mesh by adding “_High” to the end. This will allow me to bake in substance later. I started by bevelling the edges of my high poly model so that it did not look as square. I then smoothed the high poly model.

High Poly

High Poly Mesh

Below will show the differences between the low and high poly meshes

ComparisonHigh Poly Name

High Poly Amount

Low Poly Name

Low Poly Amount

Once this was done I exported both the models separately as .FBXobjects and imported them into substance so that I could bake and texture. However I had encountered a problem with the bake as I think that my low poly axe may have had too little detail and my high poly had too much. Due to the bake not working properly I could not texture the object. Because of this I am going to do some more research into baking to see where I have went wrong.

Imagine Worlds – Further Development of the Cabin

Since my last blog post I have continued to put work into the different components that will make up the cabin. So far I have created:

  • A normal wall panel
  • A window wall panel
  • A door wall panel
  • A wooden beam
  • The floor panel
  • The decking
  • The front steps

These will be assets that can be used in unreal and stuck together to create the basic shape of the cabin. Currently the cabin has a small plan of the layout which can be seen in the last blog post however this is not final. Because of this the cabin can easily be made bigger or smaller as all of the walls and pieces are separate objects. The images below will show the work flow I had with the creation of the cabin so far. I created the textures in Substance and then placed the FBX exports into a new Maya document and also placed these substance textures onto it so I could have a quick mock up of the cabin before importing the objects into Unreal.

This is what the front of the cabin will look like, it is made up of the Door panel, 2 window panels and the wooden posts.

I then added normal panels onto the sides.

I then added the floor panels.

Originally the beams were supposed to for the corners of the cabin but I also used them for the connections between the decking and the flooring.

I did not like the original wooden texture I had used so I went for a more unique look and changed the texture to stone.

I also had noticed I had accidentally put the stone around the wrong way so I rotated the UVs and textured. I also added more wooden posts for separation and added the steps I had modelled and textured.

Toni Used my panels as a quick mock up of what the sizing and spacing of the rooms could be inside of the cabin.


Imagine Worlds – Early Development

Over the past couple weeks my group and I have began to plan out our project by going into a little more detail, the original concept was to do a low poly spooky environment however this plan has now developed into a somewhat run down cabin in the woods. We have created an asset list and prioritised the main assets, such as the cabin itself. The minimal viable product will be the cabin with the interior done, however the goal is to get the entire cabin finished off as well as creating a forest area surrounding it. We have decided to create this environment using Maya and we will be texturing mostly in substance painter. We are going to use the unreal 4 engine to put all of the assets in and do the level design as this will allow us to add the sound that is required but also let the player move around in the environment.

I created a basic floor plan for the cabin, this will not be 100% accurate it is rust to give a rough idea.

Rather than creating the cabin as one huge object I chose to create smaller panels that could be duplicated and stuck together. This is one of the earlier things that I have developed for this project. We are using a cube that is 170 cm in height. This will be the size of the player. Because of this I made the wall panels 240 cm in height and 360 cm in length. I have made 3 wall pieces so far, the normal panel, the door panel; and the window panel.

This was a quick sketch up –

This is showing the developed wall panels.

Early –

When texturing I had a go at using a couple different textures until I had finally decided on one to use.

Now –

Understanding the elements of a story – Aliens

As we have recently being learning about storyboards and how they can be made or why they might be used, we have began looking into the elements of a story. These elements are necessary when creating a film or a scene as it gives everyone an idea of the overarching plot.

The Elements of the film “Aliens”

Setting – LV-426 is the primary setting of the film, this is a moon that has been colonized by humans.

Characters – Ripley is the main character of the story, she has awoken after being in a cryogenic sleep for 57 years. The other characters are marines.

Plot – The film opens with Ripley waking up from cryogenic sleep 57 years after the first film. She tells people about her struggle with an Alien in the past and no one believes her until a colony on LV-426 goes quiet. As Ripley was the only survivor and has encountered these aliens (Xenomorphs) before this she is asked to consult and go with the marines on a scouting mission to LV-426, they find one small girl named Newt and things turn south and the marines must escape.

Conflict – The primary conflict is between the Marines and the Xenomorphs and the marines need to hide and fight against the aliens so they do not get killed. There is also a man working for an outside company who has been tasked with bringing back someone that has been impregnated by an alien.

Resolution – They find a ship to escape on but Ripley takes it into her own hands to destroy the colony to try and kill all of the Xenomoprhs.

Point of View – Primary POV is from Ripley but it also shows the marines view of the situation.

Theme – Survival against a greater enemy, with Horror and Sci-fi elements.

Image result for aliens movie

Using this films elements I designed an object that would fit with the theme. I created a flame thrower using a variety of reference images.

Flame Thrower Concept

Storyboards – Sketch up Practice

Today I started by downloading a model of a house from Warehouse3D, this house would be used as a reference so that I could get a sense of depth within a 3D storyboard scene. This could show me what an object would look like from different angles, as in film there would be different angles of shots. Once the house was imported I activated the shadows option and changed the view to sharp lines.

Storyboard

Once I was happy with the sketch render of the model I could export this as a PNG. I then imported this into Photoshop and sketched over it using the drawing screen.

Storyboard PS

Imagine Worlds – Planning

Last week I was given a group for 3D modelling and the group came together to imagine a world that we could create. This would get us used to the pipeline of a group and the different steps that must be taken to create a world. The first step was to think of a concept and the chosen concept was a spooky setting that would be low to medium poly. To get us started the group was sent off to begin research and also possibly sketch some ideas for the project. As drawing is not a strength of mine I sourced some reference images and created a mood board.

Moodboard

So that the group can keep track on what each other we have chosen to do some project management using the website Trello. This allows each user to post pictures and create post-it notes on the main page. This is knowledge we I had learned last week in one of the other classes and this has been helpful.

trello.PNG


Storyboard Practice

Today with Tony we began to work on our story-boarding skills and also learned different ways we could create these storyboards through the use of 3D models that could be sketched over. This would help with perspective if the drawer was not 100% sure, it also helps if you’re modelling skills are better than drawing. We had a short extract that we had to storyboard for using the drawing screens.

Once a guy stood all day shaking bugs from his hair.

1

The doctor told him there were no bugs in his hair.

2.png

After he had taken a shower for eight hours, standing under hot water
hour after hour suffering the pain of the bugs,

3

he got out and dried himself, and he still had bugs in his hair; in fact, he had bugs all over him.

4

him. A month later he had bugs in his lungs.

5.png

Introduction to Substance Painter

SP

Masks allow me to show and hide certain parts of the textures. I added a black fill layer to the top of my model and added a white mask to this. I then added a red fill layer under the masked layer. I then re selected the top layer and selected the parts of the model I wanted the black to be removed on. Mask

Before Mask –

Without Mask

After Mask –with maskturtle maSK

I had trouble getting the normal maps working on the render. This is a problem that I will research into how to fix later.render

This is what the render looked like without maps. I liked what this character began to look like as my style of colours was to make the turtle look almost robotic.

capture