Maya – Pocket Knife

As my class was off on the Thursday I decided to spend a few hours of the day developing a pocket knife in Maya to try and keep up to date on work. This model has taken me a fair few hours to develop as I hit many different stopping points due to me not liking the look of the model and also things not working correctly. I do not have an early development screenshots however I made a crucial mistake on my first attempt as I accidentally extruded the same face twice leading to me not being able to UV unwrap the model correctly allowing me to texture. Because of this I had to restart the model however this was an annoying this at the time but on my second attempt the overall shape looked better.

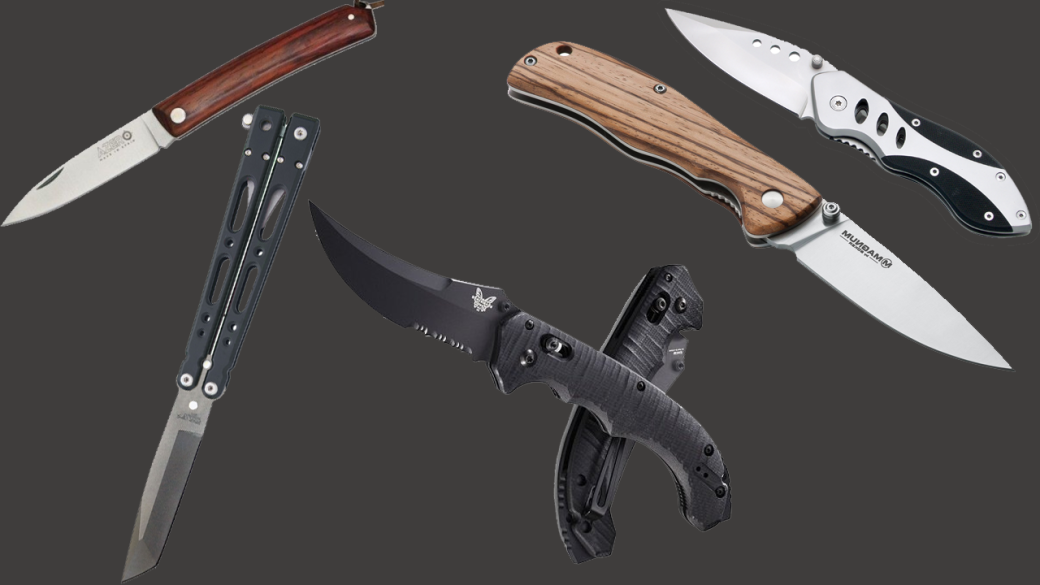
Before I began to model I looked online and created a mood board of some of the more interesting knives that I could use for inspiration in my model.

Untitled-1

Firstly I developed the handle using a reference image from the internet. I created this shape bu extruding from a square. For the grips I beveled the edges to give it a more softer look. I then UV unwrapped and textured the handle.

0

At the time I really like the look of the handle, because of this I began to develop the blade.

Capture

I then UV unwrapped and textured the blade, I may have taken some inspiration from CSGO for the faded texture rather than the standard solid silver colour blades would usually be.Fade

Next I created some screw shapes from a cylinder and made these silver. I also went back and added a golden outline to the leather on the handle to put a divide between that and the metal.

1

Once I had reached this point I began to dislike the colours and textures that I had chosen for the handle. I thought it may have been the screws that I disliked so I changed there colour to gold, I did prefer the look of this more however I thought the leather handle looked a bit off.k3

Because of the above reason I redone the texture completely by changing the leather to a rubber grip and making the black metal outline a silver colour instead. I did leave the golden outline in place because the buffer between the metal and rubber in necessary.

k4

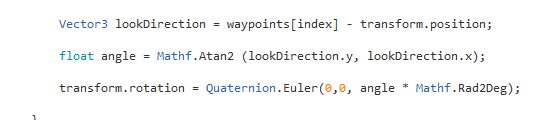
As its purpose is to look like a flip knife I added a short animation to it of it retracting.

Knife.gif

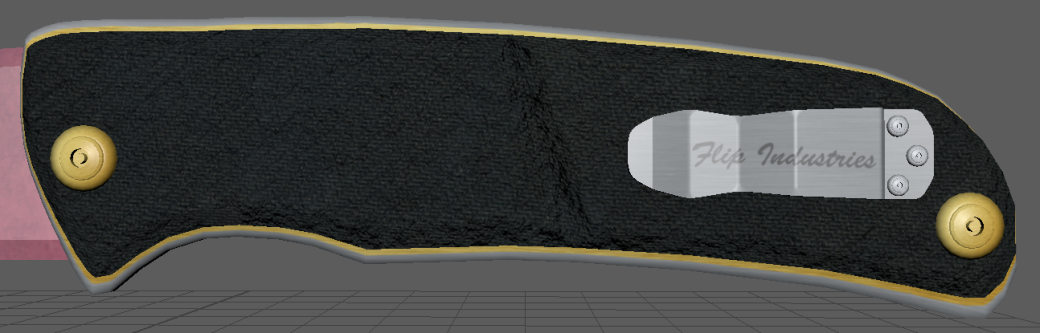
I then began to add a little more detail into the knife. Firstly I created and textured a clip that also included a fake brand name.

Clip.PNGOnce this was added a added a fractal bump map to the inner part of the handle to make it look more like a realistic grip.

Bump

I then went back to the blades texture map and added a small tally to one side of it.

Knife tally

I then changed my mind again and did a U-turn and decided to change the writing that was on the clip to something more fitting. As it is a knife I chose an SAS theme.

Clip.PNG

After I was happy with my knife I duplicated special on the blade and the grip to create the other side, this was so the knife would be symmetrical. Of course on one side I missed off the tally on the blade and the clip was also only on one side of the knife as this would look weird on both sides.

duplicate.PNG

I then rendered out the knife using Arnold. For some reason I could not get the bump maps to work with this renderer.


Render

render 2.png

As I had not batch rendered in a while to refresh my memory I did it for the knife, I simply made it spin on the spot to show it off from all sides. I also added a lighting effect and background in premier.

Sketchfab Upload –


VFX – Magic Ball

test

In my VFX lesson today I was introduced to the concept of magic and how it can be implemented into video to add a cool and appealing feeling to raw footage.

The first step was to shoot the footage on a phone then place this footage into after effects and create a composition using this. I then went onto footagecrate.com to get an effect that would go well with my footage. I chose a ball of electricity. I then downloaded this and inserted it into the project.

To make it fit in with the video I added in some key frames where I changed the size, position, rotation and opacity of the electricity. I then set these key frames accordingly with the video so that the ball would move with the motion of my hands.

For an extra layer of detail I added a colour change that happens as the ball expands and I also added a blue particle effect to the ball so it looks like small sparks are coming from it. If I was to do this project or something similar again I might do something more interesting that requires tracking so that it may look a bit more realistic and better as it looks a little bit odd.

Intro To Sculptris

Today in art to continue the theme of character design I began to look into different software packages such as mud box and Sculptris. The entire lesson was spent on sculptris to get used to using the different tools such as the drawing and grab tools.  I began to sculpt into a sphere and make the basic head shape and then I began to add detail such as eye sockets and a mouth. Through the creation it slowly began to look inhuman and very alien. Because of this I added alien detail such as horns, spikes and also smaller details. I am pretty happy with how this turned out overall.

Sculptrispt 2pt 3

I was pretty happy with how I made this head from a sphere.

Star Wars Inspired Title Card

GIF

Last week the class was tasked with creating a Harrison Ford title card using the boulder from one of his famous movies (Indiana Jones). The task this week was to create a title card using my own ideas and I chose to do my name using a Star Wars theme. I did not get it finished this week however I did get pretty close. The title starts with an X-wing flying through the screen and my name appears behind it. I went on a font generating website to be able to get my name using the star wars font. After this the name turns red.

Colour Change

To add more detail to this I have added it to premier and began to add sound effects and some other transitions to improve the overall quality. I will have this done by next weeks lesson.Last Pic

High Poly Group Project – Planning

After learning about bump maps last week our class has been tasked with getting into groups and creating a small scene. Each person needs to create one very detailed model that would go towards the larger scene. My group had thrown around many different ideas for themes such as Pirates, steampunk and sci-fi. In the end we decided on our scene being an underwater base that has sci-fi elements. The chosen art style was also a more stylized painted texture rather than sourced textures. I have been tasked with creating a harpoon gun that will go in the base. I will be creating a texture map and a bump map for this to make it as realistic looking as possible. I have done some research into these models for an idea of what I can make the object look like.

Image result for Harpoon gun

Image result for Harpoon gun

Image result for Harpoon gun

Art Deco Simple Model

After doing my art essay I had gained a small interest in Art Deco as I began to really like the style, because of this in my hour free I began to experiment with shapes in maya to try and create the basic shell of a building. I took inspiration from other Art Deco buildings for this.

kk

If I have time in the future I may begin to develop this by adding a texture and more detail.

Game Jam – Continued Development

I began to add some of the final scripts into my test game, this week I made the enemies fire projectiles and also face the way that they are travelling.

Projectiles & AutoFire – The first script I added was Projectiles to the Shuriken. To do this I placed my asset into the scene, dragged rigid body and collider, and projectile code onto it. I then placed the shuriken back into the assets.

Projectile

Once that was done I added the auto fire code to the ninja and placed the shuriken into the Projectile prefab.

L

Auto Fire

enemy

RotateToFace –

Next I noticed that my enemies do not face the way that they are travelling so I added some new lines of code to the waypoint movement 2 Script. This was placed under Void Update function.

New code

if this was to have been on the Waypoint 1 code “waypoints[index]” would be changed to “endPoint”.

Facew turn

Finishing the level in its current state was very difficult as the level would reset when the enemy collided with a wall. To change this I added a tag to the enemies so that the level only resets when i collide with them. I then changed the code so that this would only happen under this circumstance.

kk

The “Enemy” tag was added to the enemy ninjas and also the shuriken prefab object.

Cone & Line of Site – At the end I added the cone and line of site script to the enemies. I also placed the enemies in a new layer called “Enemy” so that they do not collide with the shuriken. I did this through the Physics 2D project settings.

pt1pt 2

The enemy now stops when he spots the player and fires at him.

enemy 2


VFX – Independent Project – Planning

The first step in the planning of my VFX project was to think of a unique idea that I could do. I had various different ideas but chose to do something involving magic and disappearing. I created a storyboard for the project which has the basic story with a small description underneath saying what is happening in that scene and the actions that are taking place.

Storuboard 1Story Board 2

My drawings were just rough and simple sketches and as the writing is hard to understand I have listed the scenes below.

1 – Thief (Character 1) is sneaking away after stealing something.

2 – The camera then pans to the security guard (Character 2).

3 – The camera then fast zooms onto the guards face.

4 – Black bars appear and the guard looks angry.

5 – Then zooms back out and the guard tells him to stop.

6 – Camera shifts back onto the thief.

7 – He looks shocked and then shifts his arm towards the ground and uses magic to escape.

8 – A shot of the tornado covering up the thief .

9 – He has vanished.

10 – Final shot is of the security guard looking at his coffee thinking he needs to lay of the caffeine.

Once I had finished the mood board I began to develop a practice shot to get an idea of how I can do the visual effects on the scene.

Character Design – Head Creation

Today was the day that I had an hour to develop my head, there was a twist on the creation of the head; rather than creating it in a piece of software like mudbox the class used Plastisine . Developing models with this was very difficult at first as getting the basic shape was hard and the final result was not the best however I did get the cartoony but realistic feel that I wanted.

Cartoon Head 2Cartoon Head 3Cartoon Head

If I was to have redone the head I would have gone for a more realistic approach by having a real looking mouth and also a more defined neck. I do like my model however it could be greatly improved in terms of the overall shape. Doing this has also helped me get some knowledge in how I could sculpt in software such as Mudbox and Sculptris.

The model also looked greatly different from any of my drawings as it was a hybrid of a couple of them.

I had a little bit of time left at the end so i modeled an elephants head and body, as I thought my head was what I wanted it too look like.

VFX – Indiana Jones Word Crush

GIF.gif

To try and improve our various skills in After Effects we were tasked with moving a boulder across the screen using Nulls for position and Rotation. The boulder would then move across the screen and crush the words in its path. The words were crushed using the puppet pin tool and the puppet starch tool. I moved along the time line and as the boulder moved towards the words I moved the top pins down so that it would look as if it was being crushed. The task was not that hard it was just a bit repetitive and tedious moving each of the individual pins down a couple at a time across the whole name.

beforeAfter