Thinking Inside The Box – Sofa, Table, Door & Extras

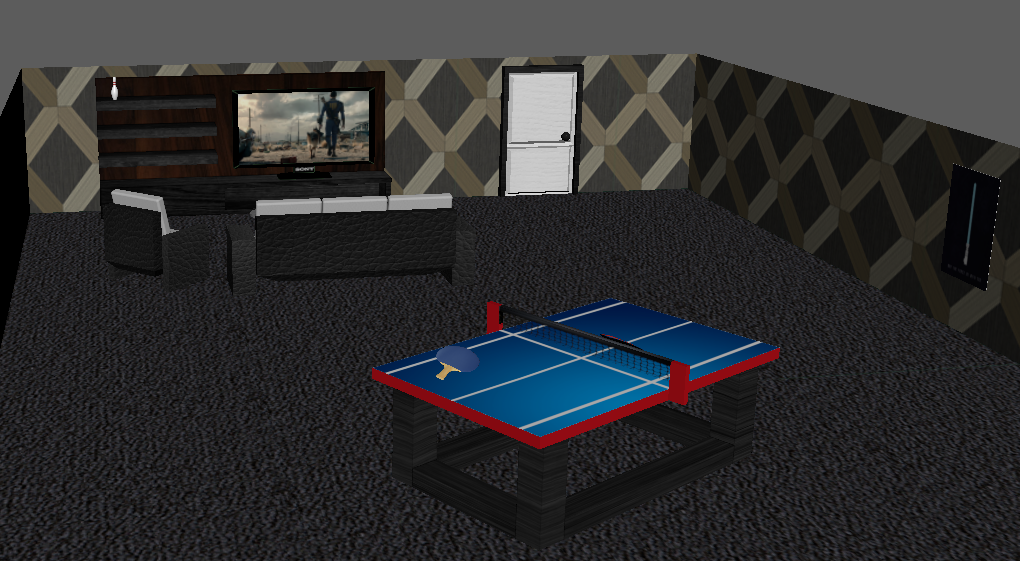
Tonight was a very productive night for modelling so I have chosen to stick all of my images into a single blog post. Below are the various different models that I have created for my room.

Door –

For the door I started with a cube and simply began to extrude the different faces until it had a nice amount of detail, for the handle I created  a sphere and a cylinder and combined the shapes together.
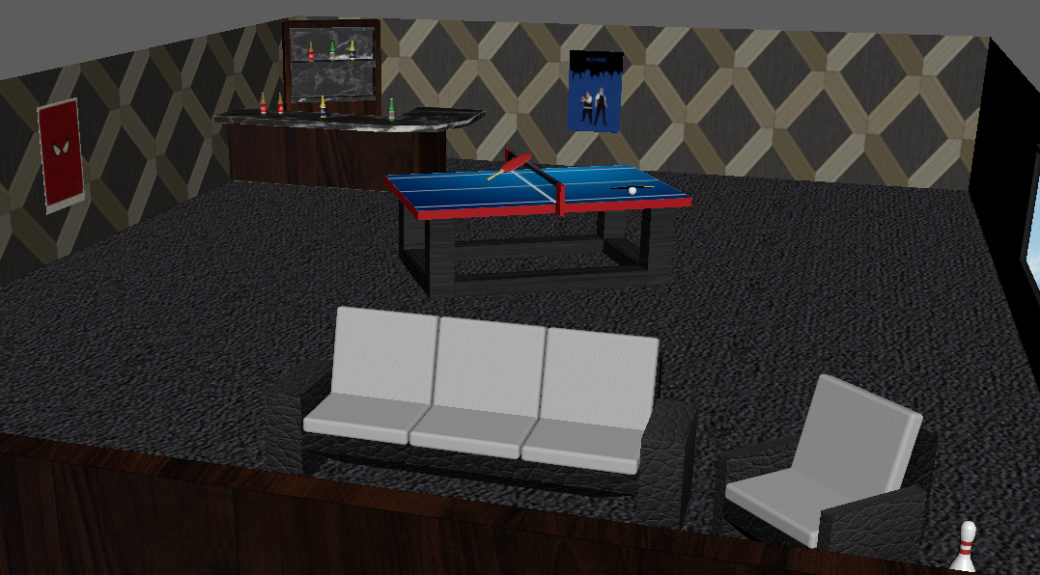
This slideshow requires JavaScript.

Bottles –

The bottles wererather tricky to create, I started out with a cylinder and had to get an image for reference, I then used this image in maya to allow me to fit the edges of the cylinder with the bottle so that I could get the basic shape. I then  created the bottle texture by selecting a colour and making it 50% transparent so that it looked a little bit clear. To add a little bit of variety I created three different types, all different colours, and all different labels.

Sofa –

For the sofa I started with a cube then created the basic shape using the one in my room as a reference. The pillows were then created separately and placed onto the sofa. As I had the basic sofa shape I was also able copy it, shrink it down a little bit and create an arm chair.

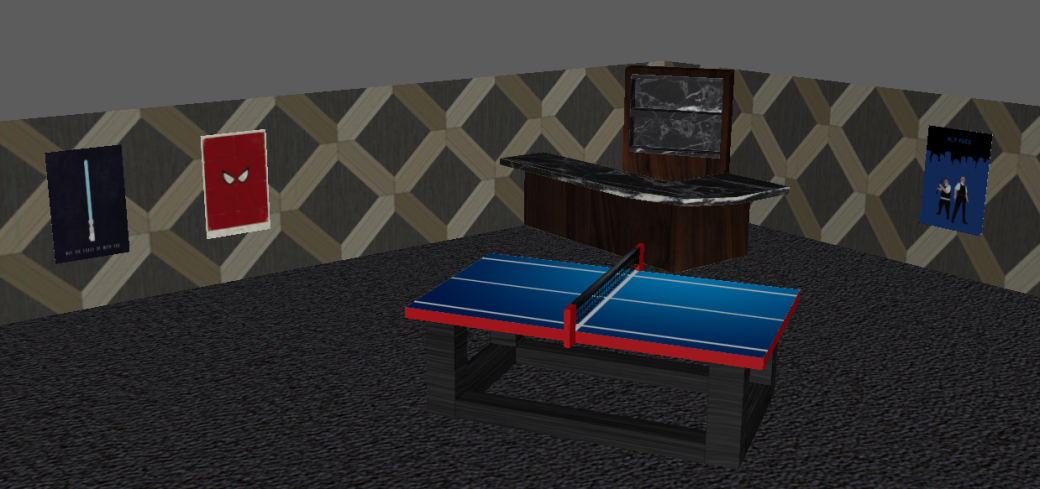
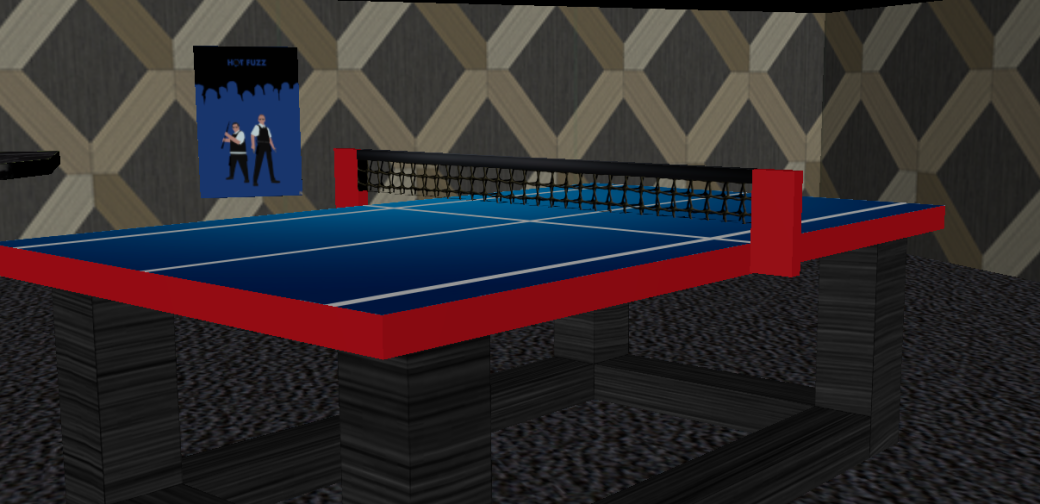
Ping Pong Paddles & Ball  –

For this I used a similar technique that I did with the bottle. I found a reference image and resized a cylinder into the same basic shape. As it was such a small item I dragged and dropped the textures straight into the shaders. There were three in total. One for the handle, and two for the sides. The ball is the simplest thing I have made so far and I do not think it warrants a description on how I made it.

paddle-and-ballping-pong-blueping-pong-red

Coffee Table  – The coffee table was a bit of a pain to create, This is because I had to create the top as a separate object, It took me about three attempts to notice this. This is because I tried to have the stand connected to the top by extruding the faces, however when I put the transparent texture on it caused the stand to go see through as the top face was transparent. I ended up creating the top completely separate and then texturing this by turning the transparency up on the shaders options.

capture

Bowling Pin –

Finally I made  a bowling pin because I think they’re cool and will make good scenery in my room.

1png


Thinking Inside The Box – Progression 2

Today I have created a couple more objects to go into my room, I created some smaller items such as ping pong paddles to go with the table and some bottles to go with the bar. I also created a sofa and a table to accompany the TV unit that is in the corner of the room. After further inspection I had noticed that my room was also lacking a door so I created one, I also modeled a window. As the objects were so simple to make they did not require UV unwrapping so I simply added the textures to the different shaders. For the sofa I UV unwrapped the Item however when the texture was applied it was very distorted, after testing it with a few different images I just simply dragged the texture onto it and it looked surprisingly good.

Progression Image –

overalloverall-2

Drawing/Animation – Cartoon Cups

On Thursday we began to look into animation and the fundamentals of animation, because of this I decided to do a quick sketch up of different emotions on the same object. I took inspiration from a McDonald’s cup that was on my desk and drew that. I then added emotion through the use of body language which in this case was through the straw and also facial expressions. I also had a little fun with my drawings by giving the emotion a nickname to add to the character. I tried to keep my character simple and rather cure looking for visual appeal so it is easy to remember. We watched a short Pixar clip of two lamps which I also took inspiration from for this drawing; giving an inanimate object emotion is interesting.

Here is the collection of drawings that I sketched up quickly.

all-cups

Thinking Inside The Box – Progression Part 1

Tonight I had came to the conclusion that I had created enough objects that I could get a feel for how big the room would be so I began to design the basics of it. I started the room by inverting a cube so that the faces were on the inside. I also set the display to Backface Culling. This meant that the nearest faces to me do not appear so that i can design the interior with ease. I then UV unwrapped the cube and added a wallpaper and carpet texture to it. This may not be final it was just so I could get  a basic feel of what the room will be like. I then began dragging and dropping the objects I created into the scene, the room began to fill up rather nicely and I personally think I have made good progress so far, I have hit a few minor problems along the way that were easily fixed and one major problem which resulted in me having to completely redo the model but overall I am really enjoying learning the ins and outs of Maya. Below are a couple screenshots of how my room is coming along.

early-1early-2early-3early-4early-5

Thinking Inside The Box – Mini Bar

The next stage in this project that I chose to do was the mini bar, this was very simple to make, I started with a rectangle, extruded some faces to make the basic shape of the bar, I think UV unwrapped it and textured it, I did the exact same for the shelf behind the bar. I made this as two separate objects so that it would be easier to texture when it came to it. I believe that this was the right choice as I had no trouble texturing. There was also parts of the object that would not be seen so I did not bother texturing these parts.

UVs –

Finished Product  –

This slideshow requires JavaScript.


12 Principles of Animation

Squash and Stretch – This gives the illusion of weight to a character when it moves. This means animating the dialogue and doing facial expressions. This may be used in extreme and minor cases.

squash-stretch

Anticipation – This is a movement that prepares the audience for an action from the character, for example the character may duck down before jumping into the air

anticipation

Staging – An action should be clearly communicated to the audience. The attitude, mood, reaction or idea of the character needs to relate to the story and continuity of the story line.

staging

Straight ahead and pose to pose animation – Straight ahead animation begins at the first drawing and works drawing to drawing till the end of the scene. Pose to pose is planned out and charted with key drawings.

straight-ahead-pose-to-pose

Follow through and overlapping action – When the main bdy of the character stops the other components of the body will continue to catch up the main mass of the character. An example is a piece of clothing a character is wearing may need to catch up once the character has stopped moving.  Overlapping is used when the character changes direction, for example in this scenario the hair may go in front of the character.

follow-through-and-overlapping

Slow out and slow in – As action starts, we have more drawings near the starting pose, one or two in the middle, and more drawings near the next pose.When there are less drawings the action is faster and when there are more the action is slower.

slow-in-and-slow-out

Arcs – Most actions will follow an arc or circular path to give them a more natural looking movement.

arcs

Secondary Action – This is used to add more dimension to the character. A secondary action is one that follows the characters main action. This will either supplement or re-enforce the main action. For example a characters main action may be running but the secondary action will be it leaning forward to add emphasis on the main action.

secondary-action

Timing – he basics are: more drawings between poses slow and smooth the action. Fewer drawings make the action faster and crisper. A variety of slow and fast timing within a scene adds texture and interest to the movement.

timing

Exaggeration – The primary example of this is a character may move more exaggerated so that it looks more crisp and natural. The same applies to not only movement but also facial expressions.

exageration

Solid drawing – The basic principles of drawing form, weight, volume solidity and the illusion of three dimension apply to animation as it does to academic drawing. The way you draw cartoons, you draw in the classical sense, using pencil sketches and drawings for reproduction of life. You transform these into color and movement giving the characters the illusion of three-and four-dimensional life.

solid-drawings

Appeal – All characters in animation need to have appeal, characters can be appealing in different ways, they may be heroic, cute or even evil looking. Easy to read designs are apart of the appeal.

appeal

This is a playlist with a more in depth analysis of the 12 principles

Lighting Research

Directional Light – This is light that travels in a certain direction, this sort of light can be used to but emphasis on certain things or objects. In terms of modelling you may want directional light in a simulation of realism; for example in a house the direction the light may be coming from the window because the sun would be shining in. In this case the sun is the directional light for the house.

Ambient Light – This is the light that surrounds the environment or object, it will have a fixed color and intensity and it effects everything in the scene equally.

Point Light – This emits light in all directions from a single point.

Spotlight – A spotlight is lighting that will place emphasis on a particular object. It is usually a a narrow and bright beam of light that will keep a certain area bright to keep the attention on that.

Area Light – This is a light source that illuminates a significant area. For example an area light may be used in a house to light up a room.

Volume Light – This light it used to provide light that will provide an effect that goes with the atmosphere or tone of the rendered environment. Its like filling a volume with light. This may be used for light shining through tree or windows for example.

Light intensity – This is the amount of energy the light has, if the intensity is low then the light will be dim and vice versa.

Light colour – This is the colour of the light, this will usually be used to set the mood in a scenario. For example in a scary game dark reds may be used whereas in a happy environment bright colours may be used such as baby blue and yellow.

Light Linking – Linking lights allows certain lights to effect different objects.

Cookies (Light) – This lets you cast certain shadows, might have an object that off screen infront of the light, for example blinds in a house model.

Three Point Lighting – The three points are key light, fill light and back light. Key light is the main light, this will usually be the strongest light in the scene and will influence the environment the most, Fill light is the secondary light that will be placed on the opposite side of the light key, this is used the fill the shadows that have been created by the key. Backlights are what is placed behind the objects its used  to provide definition and small highlights around the object outlines, this helps certain objects stand out and also gives it a three dimensional look.

Depth map shadows – these are the cheapest way of creating shadows, they use a map to created the shadow.

Ray Traced shadow – These are real time shadows which means that the results are much better than depth map and refraction can also happens. This works by casting a ray from the camera to the object back to the camera to work out where the shadows are.

Unity – Adding a Radio, Battery & Ray Casting

Today I added more components to my game, to add a little bit more immersion to the game I added some audio. I did this through the use of a radio. The first step was to insert the model of the radio that was provided. I then downloaded a song from a royalty free website and dragged it onto the radio. Next created a new C# script called RadioController which was attached to the radio. Having just a radio was a bit plain so using the same fundamentals from the door and key I inserted a battery which would need to be picked up before the radio could be activated. The inventory item script needed to be dragged onto the battery and the itemName needed to be changed to Battery.  Other than just items I also changed how the game works slightly; rather than having the player need to use the mouse cursor to click on the items I added in a raycast. This required a new script to be created called RayCaster and this needed to be attached to the camera. The script pretty much creates an invisible line that comes out the camera which means its in the centre of the players view. Because of this change the Inventory scripts needed to be changed to OnRayDown instead of OnMouseDown so it is not activated by the cursor anymore.

RadioController –

radiocontroller

RayCaster –

raycaster

Command Change –

onraydown

radio-battery


VFX- Introduction to Adobe After Effects

Today I had a short introduction to Adobe After effects. We started by importing some video files, a sound file and a Photoshop image. I then saved the after effects file into my workplace, I frequently saved throughout the tutorial encase the program was to crash. I was then given the freedom to play around with the software after we learnt about the different effects. First thing I changed was the text, I did this by changing the font and I also added the 2D Zoom Spin effect. This made the text spin onto the screen into its position. I then duplicated the main video which was the dancers. I put the duplicated video in both corners and shrunk it. I then duplicated the main video again and placed it behind the main video and added the Radial Blur effect. This made the video blurry, by putting this behind the scene it made the dancers look like they had some sort of motion blur around them. Below is a GIF of the finished video. I did render it however it sadly could not be uploaded.gif


Adobe Animate – Collectible Items

Today’s focus was on creating a collectible item for my halloween game. The first step was creating a brand new shape in the game, clicking on it and turning it into a symbol. From this I had to type in some code so that the coin was collectible. The code consists of different event triggers and an if statement. The code makes it so when the player moves over the item it is destroyed so it looks like the player has picked it up. When the code was originally typed in a made a minor mistake on the 9th line, I had accidentally inserted a typo; this problem was quickly noticed and solved. Once the code was working correctly I began to make the collectible more appealing and made it fit in with the game. As it has a halloween theme I made this item a piece of candy. The item is made up from an oval and some lines. I then painted it using 3 shades of red so it looked shaded.

collectiblecollectible-code